Zoom Busy Light Automation
How do I let the home office visitors know when a Zoom call is occurring


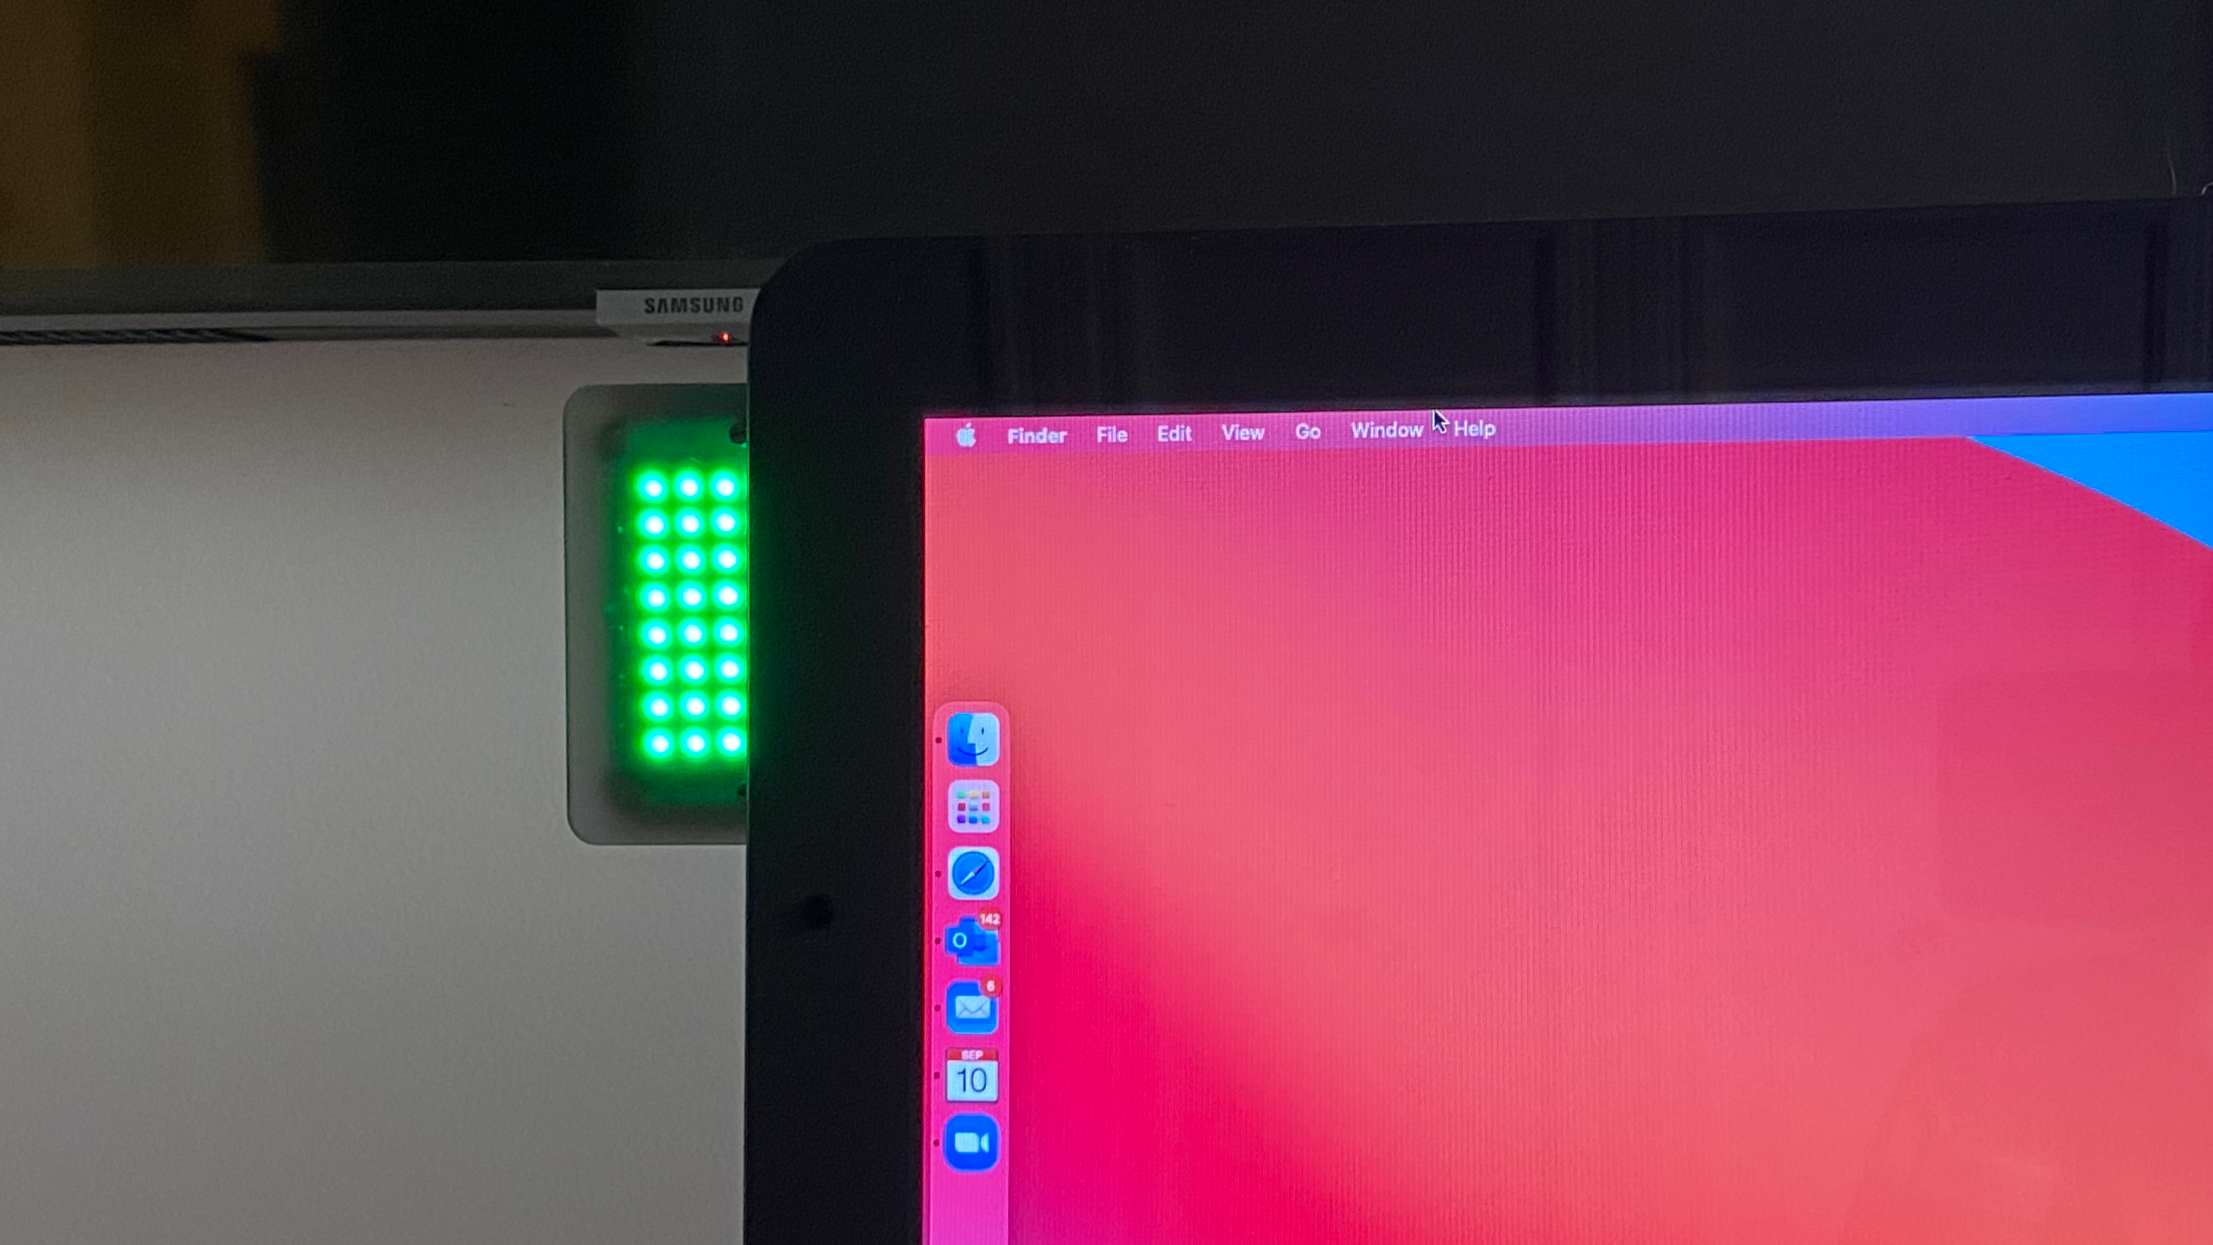
Individually addressable LEDs provide a simple way to get status of things around the home without having to pull out phone or looking at a dashboard view. LEDs are visible from 10 or 20 feet away making them easy to see at a glance. I have a couple of Homeseer WD-200+ Z-Wave switches installed with one of them is located in a hallway near the bedroom. As locks change state, the LEDs on the switch turn green (unlocked) or red (locked).
This project came out of wanting to have even more LEDs available on some device that can show status of the house. For example, could I show the status of every window's sensor having an open or closed state. As I searched around for programmable LEDs, the Raspberry Pi came up for various options of programmable LEDs. Looking at Amazon specifically, I came across many busy light products which inspired the idea. Did this idea already exist for the Pi? Of course it did.
The following does not present an exhaustive list of the steps to build what I built, but tries to present enough information and direction to allow someone else to extend and improve.
Working From Home
I have been working from home for the last two years and six of the last eight years. So the work from home part and use of Zoom didn't change much when the California Stay at Home order came down in March 2020. What changed was the home office going from a solitary work environment to a shared environment with four other people. What changed was having conference calls with no interruptions to kids needing help with something at the most inconvient times. Letting members of the family know when I cannot be interrupted makes it easier to manage those interruptions
Hardware for Busy Light
- Pi Zero W Starter Kit - Came with everything needed to get up and running with the Pi Zero and 1x8 Blinkt LEDs
- pHAT Diffuser - The LEDs can be really bright, this helps with diffusing the lights and makes them look nicer
LED Alternates
- Unicorn pHAT - A a 4x8 matrix of LEDs. Requires soldering or GPIO Pogo Pins or GPIO Hammer Header (Solderless)
- Unicorn HAT Mini - Does not require soldering
My initial work uses the Starter Kit and Blinkt light, but a newer edition is using the GPIO Hammer Header woth Unicorn pHAT.
Software Architecture
Zoom
We use Zoom at work for remote meetings. This is probably a bit unsurprising since most of the world seemingly started using Zoom. Zoom offers APIs to access their services. They also support Webhooks that will send your service notification messages when events occur. I am interested in hooking into changes to my presence.
Presence Events
The webhook system will send presence events for the following events
- When a meeting is manually started or ended
- When a meeting on the calendar starts or ends
- When status in the Zoom app is manually changed
- When the Away timer triggers
Internet Addressibility
A challenge that comes up often with webhooks is that the callback endpoint of the webhook has to be Internet accessible. My Pi Light will live in my home network and so need a path for the notification messages from Zoom to make it into my network and to the Pi.
- One option is enabling port forwarding on my router and making the Pi directly accessible from the the Internet. This would also require a Dynamic DNS service so the webhook can find my Internet IP address.
- Another option uses a tunneling service such as ngrok.com to provide a public HTTPS endpoint that tunnels to a localhost port. Either I pay for the service to get my own subdomain, or deal with potential of the address changing over time. Ngrok is great for prototyping, but seems problematic for long term use.
- Finally, looking at what I already have running at home and Internet hosted, the following items stuck out
- Home Network
- MQTT Server
- Homebridge
- Hosted Server
- Nginx
- Let's Encrypt Certificate
- Home Network
The following then became the vision for the architecture

MQTT Server
The usage of MQTT Server is a recent addition to my home automation stack. MQTT is a lightweight publish/subscribe protocol built for Internet of Things connectivity. Mosquitto is the server then used for for MQTT brokering. Clients can connect to Mosquitto and publish messages and/or subscribe to receive messages.
Mosquitto supports authentication, authorization and TLS-based communication. In other words, access to the server can be secured.
Mosquitto Bridging
MQTT is built for IoT. Bridging allows one Mosquitto server to connect to another server and publish messages, subscribe to messages or both. This allows software to communicate to a server in their local environment and process messages that branch out to multiple end-points without having to worry about how many other servers and networks might exist behind the curtain.
In this usage scenario, my home network Mosquitto server can connect to the hosted Mosquitto server utilizing an outbound network connection. It can then relay messages from the hosted instance to any clients on the local network.
The home network remains closed to inbound connections.
Nginx Server
Nginx is a web server but will be used for reverse proxy HTTP services and general TCP proxy services. While Nginx may know what HTTP traffic is, it can also proxy the MQTT traffic to the hosted Mosquitto server via the TCP proxy.
Nginx supports TLS termination on HTTP or TCP connections. Integrate with Let's Encrypt support and we have easy certificate generation and renewal.
In this usage scenario, Nginx provides the TLS termination for enabling secure Internet traffic and will proxy HTTP/Webhook traffic and MQTT/Mosquitto traffic to the underlying services on the server.
Homebridge & mqtt-thing Plugin
Homebridge emulates the Homekit API. Plugins to Homebridge can integrate with 3rd party APIs and expose the devices to Homekit. In my initial architecture, Homebridge was run directly on the Pi and this was fine. However, since the Pi Zero only has 512 MB of RAM and running multiple Node applications could strain the memory or swap. I already have an instance of Homebridge running on a Mac Mini, the existing instance could handle the additional plugin with little additional overhead.
MQTT-Thing Plugin
MQTT-Thing is a Homebridge plugin that allows integration of many different accessory types using MQTT. Using the plugin, I can expose an RGB Light to Homekit and when interactions with the light occur in the Home app or Homekit routines, the plugin will publish messages that can be listened for and update the LEDs appropriately.
Custom Node Apps
There are two custom node apps. One runs on the public server, handles the Zoom Webhooks and publishes the presence state to the MQTT server. The other runs on the Pi, handles the MQTT messages from Zoom or Homekit and updates LEDs.
Zoom Webhook & Publishing
The Zoom Webhook code is based on the following samples from Zoom, Zoom Oauth Sample and Zoom Webhook Sample. In my Zoom account configuration, the Webhook Only configuration is not available by default, but OAuth option is available. Therefore, the application had to support OAuth to register access to my Zoom account and then used a Webhook to receive the presence change events. As the presence events come in, the data is reformatted and published to MQTT.
MQTT Listener & Pi Light
The MQTT message listener and Pi LED light control application registers a subscriber to MQTT for two different topics, one for Zoom and one for Homebridge. When a message is received, it is parsed for Zoom or Homebridge commands and the command is then executed.
Steps to Success
1. Acquire Access to Internet Server
Use what you have or use one of the myriad virtual server providers to access a server.
I used Linode for this purpose.
2. Setup the Software on Internet Server
I used docker / docker-compose to install and configure the individual server software for Nginx & Mosquitto
There are many source available for installing and configuring Nginx with Let's Encrypt.
- https://medium.com/@pentacent/nginx-and-lets-encrypt-with-docker-in-less-than-5-minutes-b4b8a60d3a71
- https://www.cloudbooklet.com/how-to-install-nginx-and-lets-encrypt-with-docker-ubuntu-20-04/
Running Mosquitto within Docker
To set up the MQTT reverse proxy and TLS termination for MQTT, see the following:
- https://www.nginx.com/blog/nginx-plus-iot-load-balancing-mqtt/
- https://www.nginx.com/blog/nginx-plus-iot-security-encrypt-authenticate-mqtt/
3. Create the Zoom OAuth/Webhook & Publisher
The node app built off of Zoom's sample application code and then extended it for my purposes. The initial steps get the application up and running to receive the Zoom events via a webhook. The last steps connect it to the Mosquito server to publish the events.
The sample app instruction suggest using ngrok.com, which is fine for development purposes. A later step in the process includes bundling the application into node and proxying through the nginx server.
Step 1. Follow the example Readme at Zoom Oauth Sample to create the OAuth application.
Step 2. Add Webhook Endpoint in the Node Express application following the code at Zoom Webhook Sample.
Step 3. Update the Configurations of the OAuth application in Zoom Marketplace to enable the Event Subscriptions.
Step 3.a In the Feature tab of the OAuth app Configuration, enable Event Subscriptions and add the endpoint URL created in Step 2.
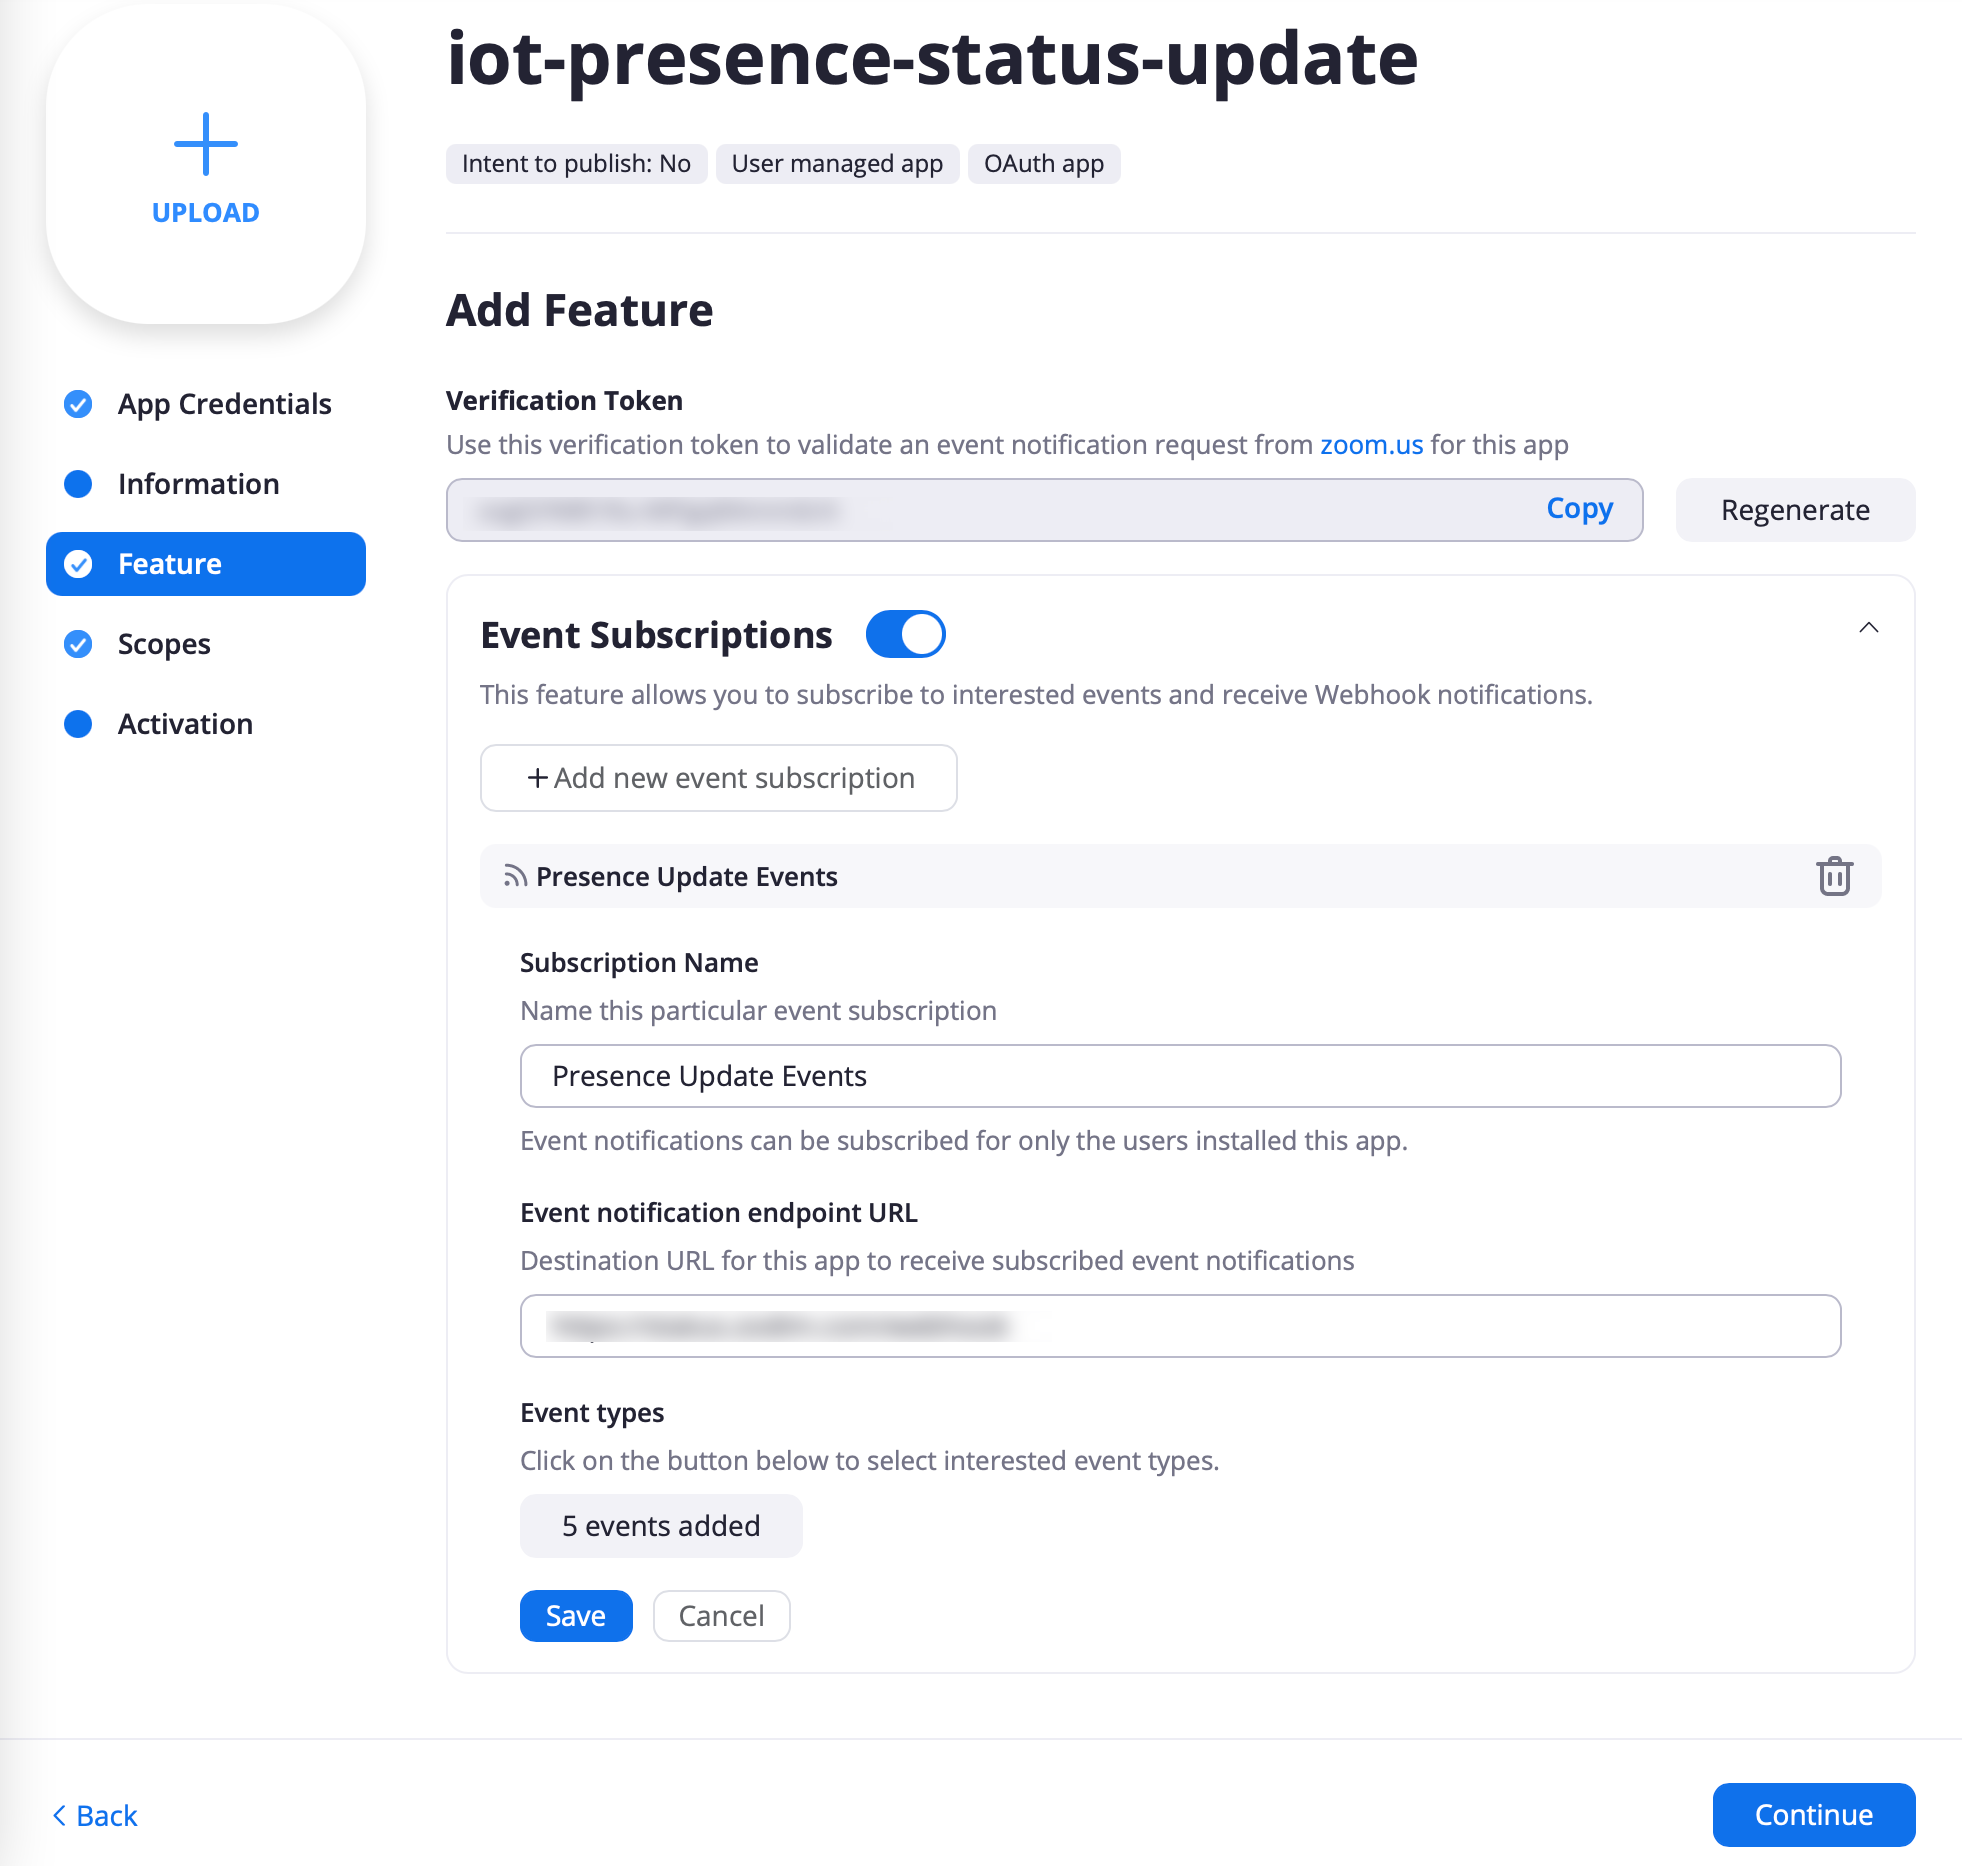
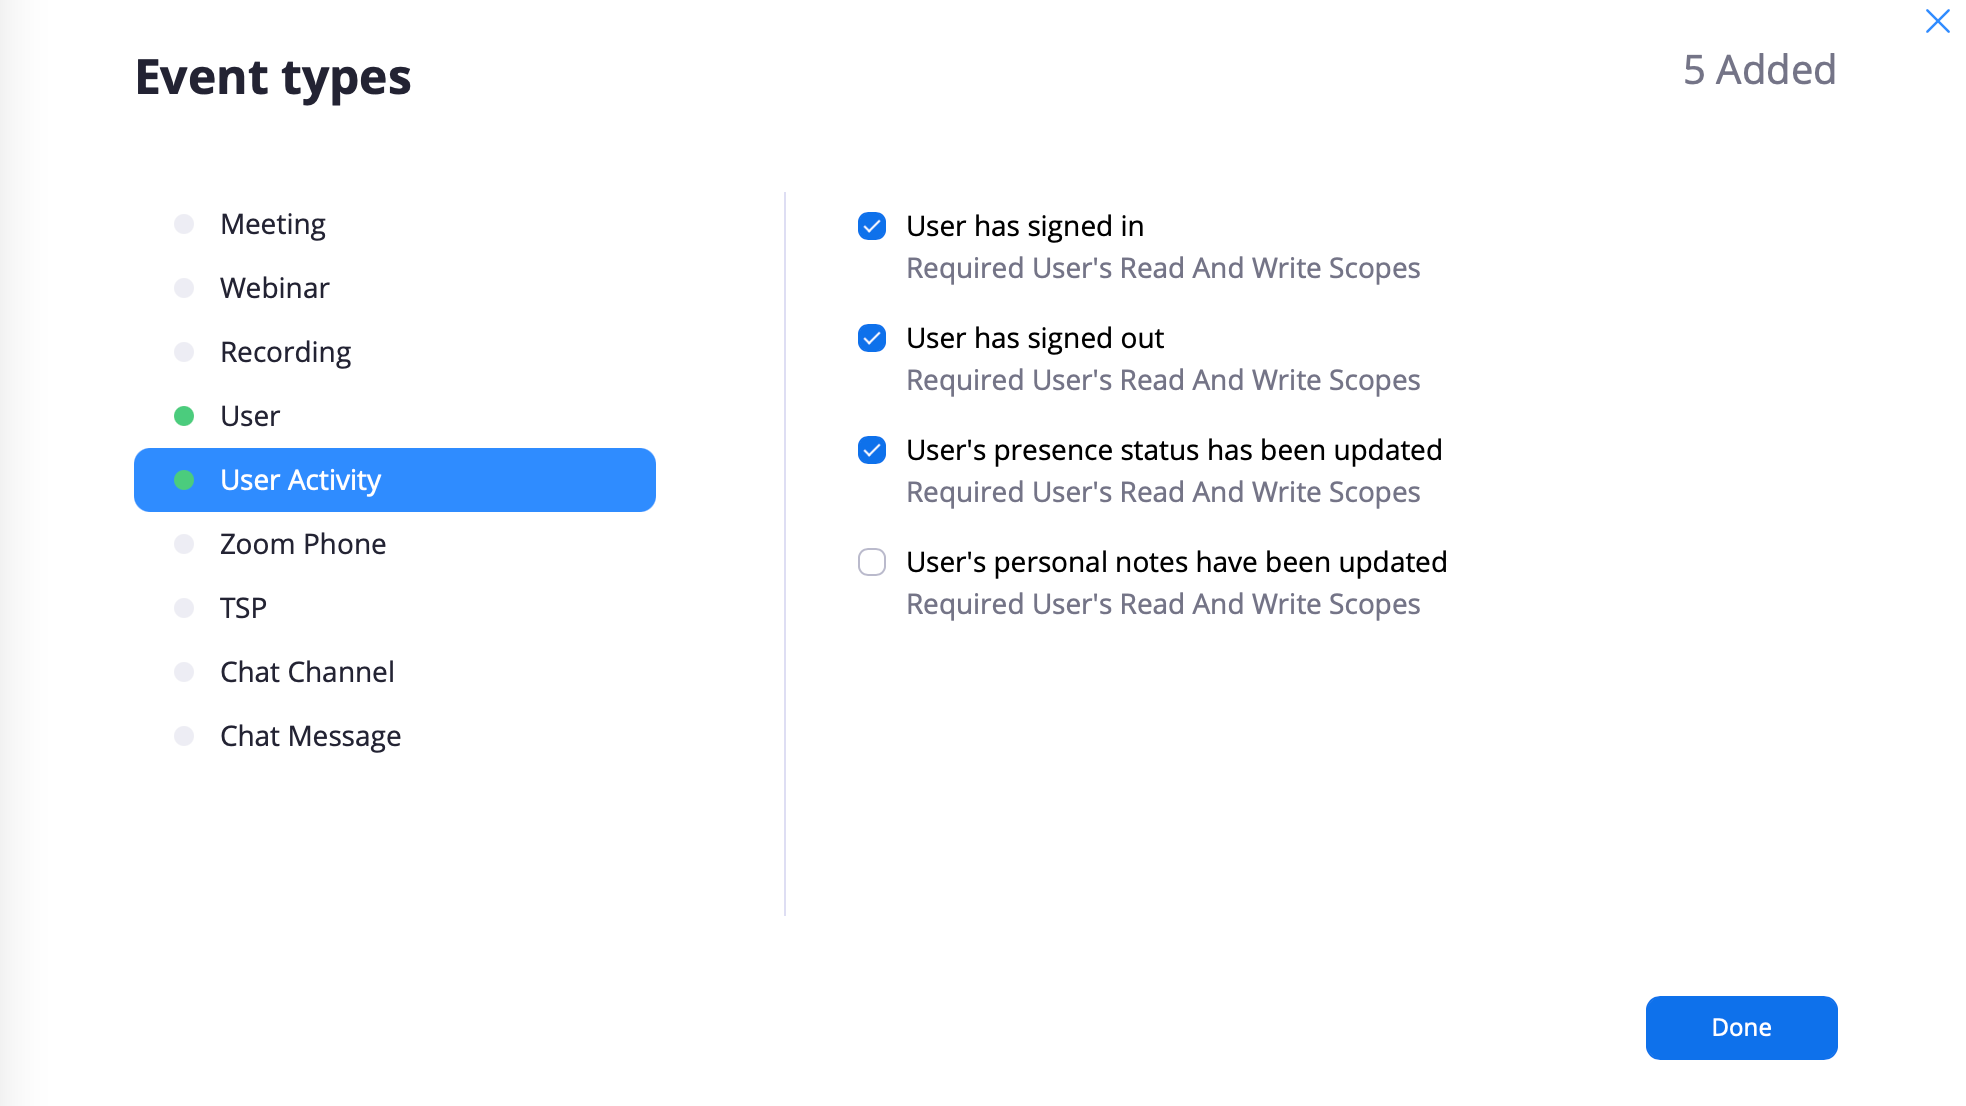
Step 3b. Under the Feature, add the Event Types for User and User Activity so the Webhook will receive the Events when presence changes.

Step 3c. Ensure scopes are set properly. Minimally, the User Information read and write permissions are required.
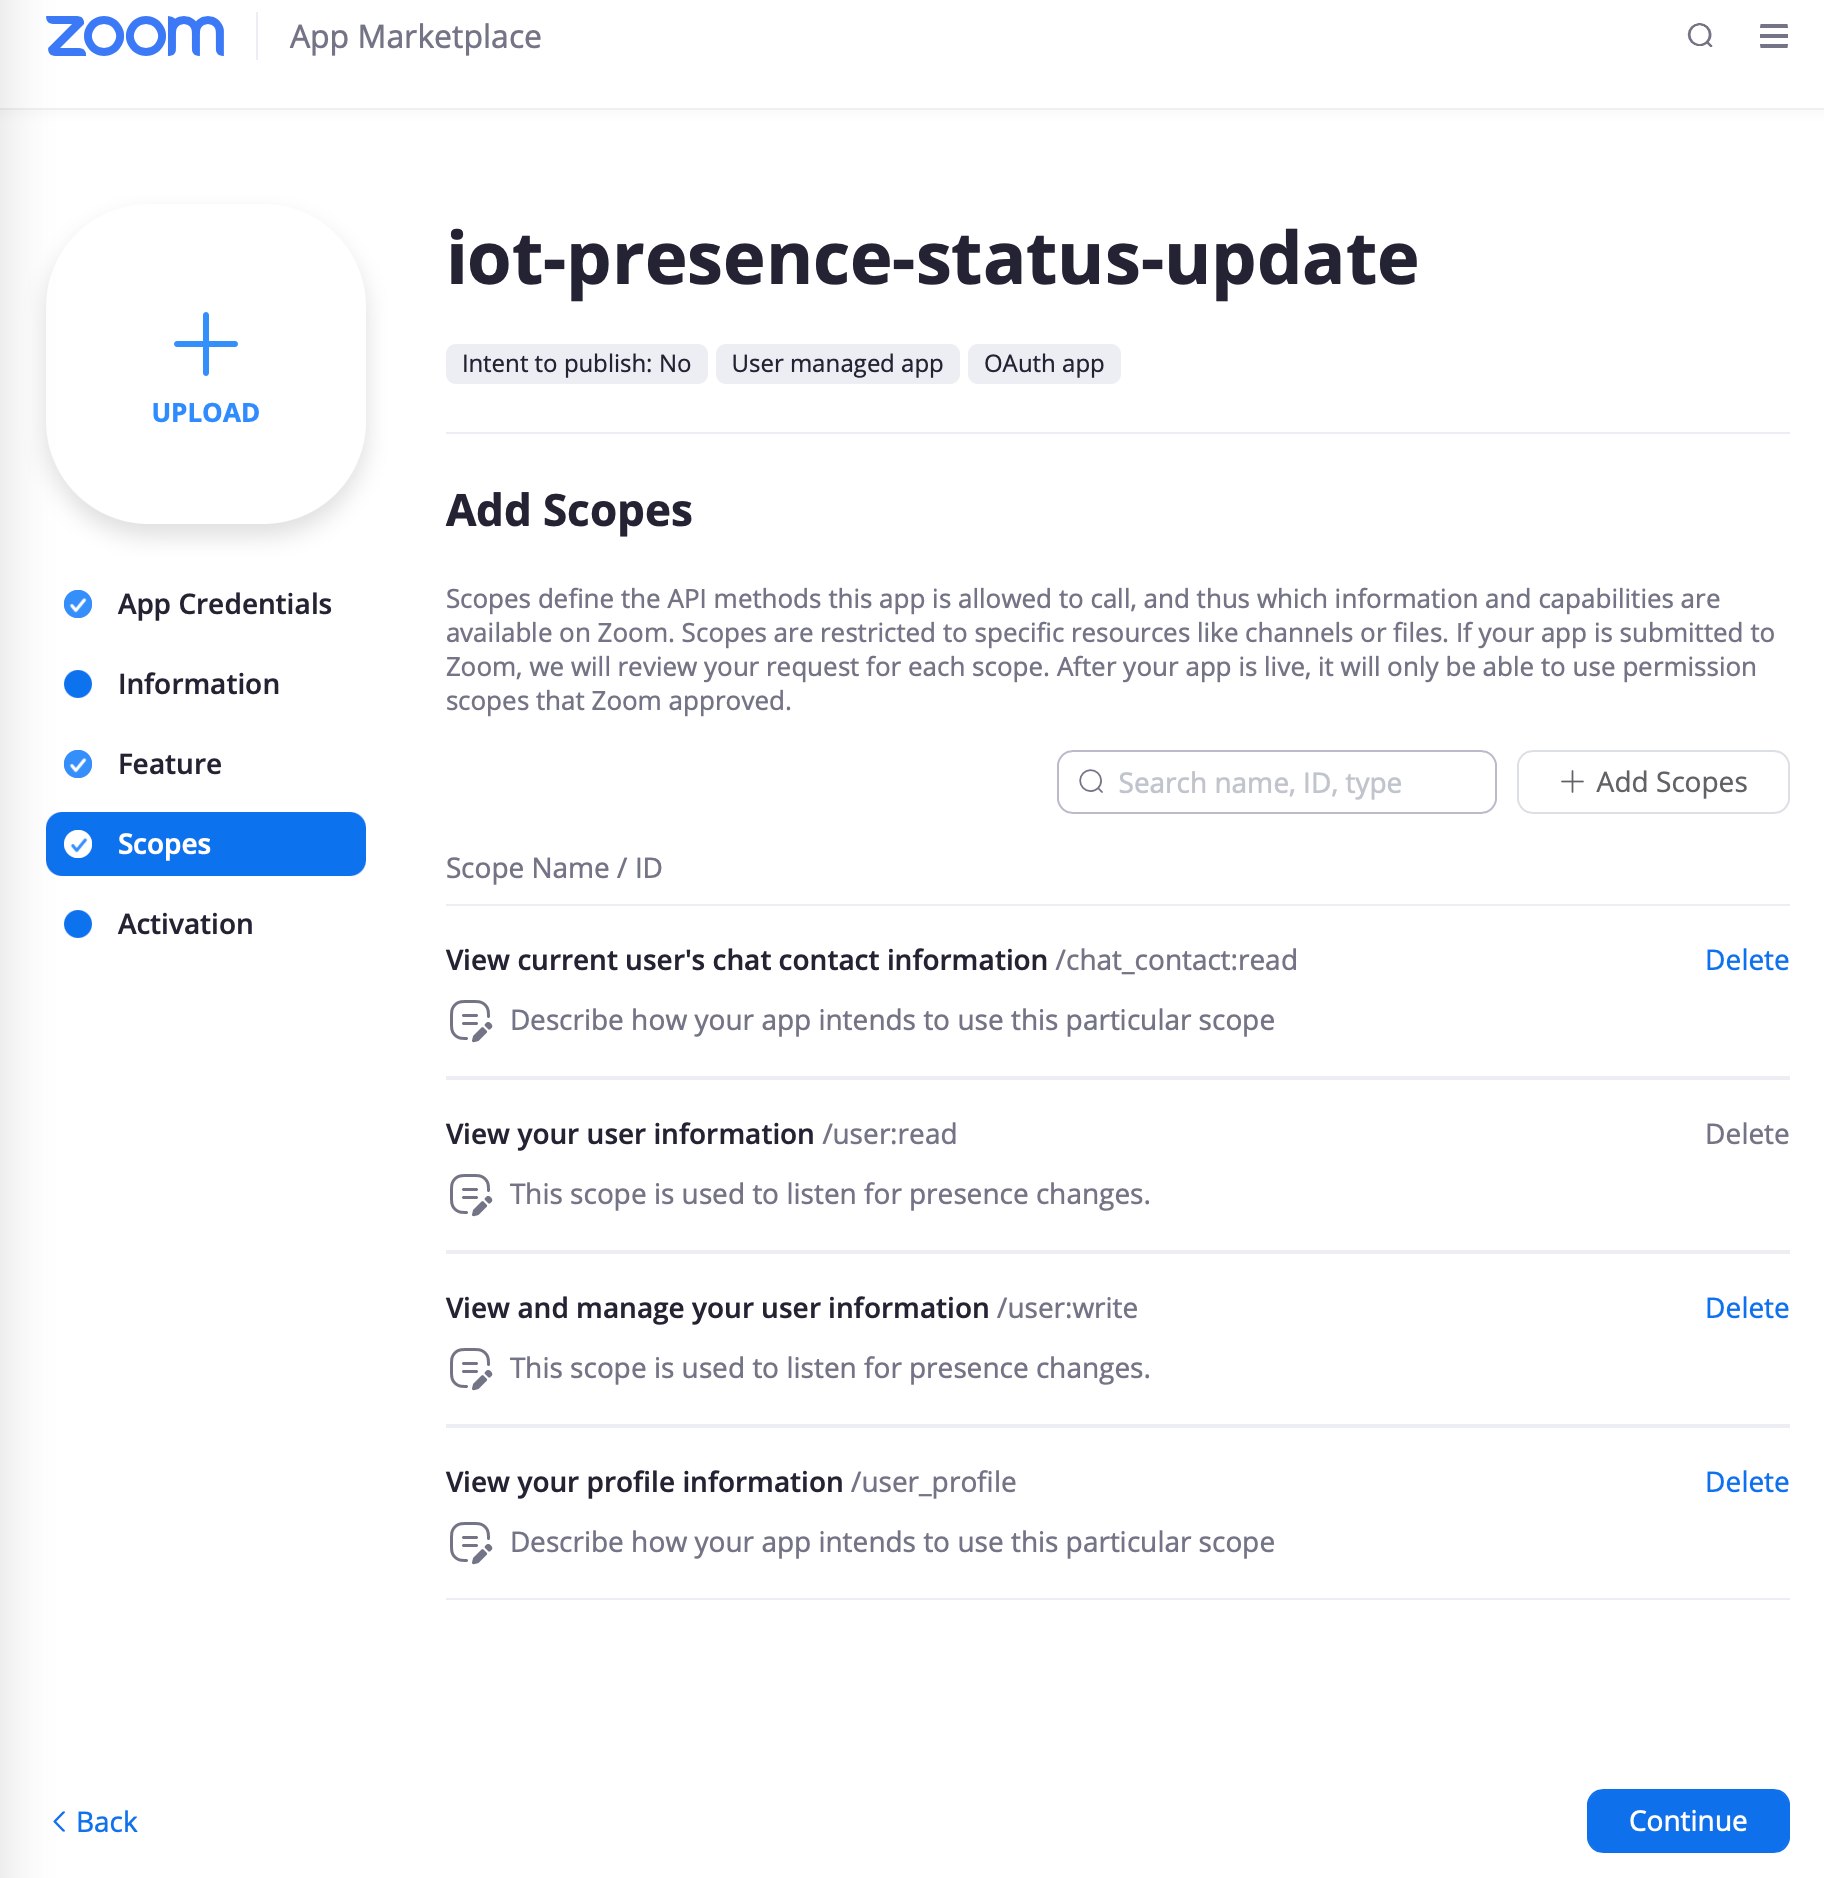
You may need to reactivate the app with the node application to ensure it has proper scopes and webhook is fully activated. The webhook should be receiving the presence messages.
Step 4. Publish the messages to mosquitto
The mqtt module was added to the node application. I then created a status.js file and Status class that contained the connection and publshing to mqtt.
The events that Zoom sends are not necessarily in order that they occur. Occasionally, an event is received that is older than a previous event received. The code in handlePresenceEvent keeps track of the last event and ensures the latest received event has a dateTime that is newer before the event is published.
const moment = require('moment');
const mqtt=require('mqtt');
const storage = require('node-persist');
let path = require('path');

let appDir = path.dirname(require.main.filename);

let addDebugging = () => {

};

class Status {
    constructor({debug, mqtt:{url, options}}) {
        this.isInit = false;
        this.lastEvent = undefined;

        this.client = mqtt.connect(url,options)

        this.client.on("connect",function() {
            console.log("connected");
        });
        this.client.on("error",function(error){ console.log("Can't connect"+error);});

        if (debug) {
            addDebugging();
        }

    }

    async init() {
        await storage.init({
            dir: `${appDir}/storage`
        });
        this.lastEvent = await storage.getItem('lastEvent');
        if (this.lastEvent && this.lastEvent.dateTime) {
            this.lastEvent.dateTime = moment(this.lastEvent.dateTime);
        } else {
            this.lastEvent = {};
        }
        this.isInit = true;
    }

    async handlePresenceEvent(event) {
        if (!this.isInit) {await this.init()}

        if (event.event !== 'user.presence_status_updated' ||
            !(event.payload && event.payload.object)) {
            return;
        }

        let eventObject = event.payload.object;

        let normal = {
            dateTime: moment(eventObject.date_time),
            email: eventObject.email,
            profileId: eventObject.id,
            presence: eventObject.presence_status
        }

        if (!this.lastEvent.dateTime || this.lastEvent.dateTime.isBefore(normal.dateTime)) {
            this.lastEvent = normal;
            await storage.setItem('lastEvent', this.lastEvent);
            console.log("Updating last presence status");

            if (this.client.connected) {
                let topic = `zoom/${normal.profileId}/presence`;
                this.client.publish(topic, normal.presence);
                console.log("published: ", topic, normal.presence);
            }
        } else {
            console.log("Ignoring presence status");
        }
    }
}

module.exports = Status;
And the Webhook sample method was updated to call the handlePresenceEvent() method instead of dealing with Webinar events.
// Set up a webhook listener for your Webhook Event - in this case we are listening to Presence and other events
app.post('/webhook', bodyParser.raw({ type: 'application/json' }), async (req, res) => {

    let event;

    try {
        event = JSON.parse(req.body);
    } catch (err) {
        res.status(400).send(`Webhook Error: ${err.message}`);
        console.log("Failed to parse body", err);
        return;
    }
    // Check to see if you received the event or not.
    console.log(event)
    if (req.headers.authorization === process.env.verificationToken) {
        res.status(200);

        if (event.event === 'user.presence_status_updated') {
            console.log("Presence Webhook Received.")
            status.handlePresenceEvent(event).catch(reason => {
                console.log("handlePresenceEvent threw exception", reason);
            })
        }

        res.send();

    } else {

        res.status(403).end('Access forbidden');
        console.log("Invalid Post Request.")
    }
});
Step 5. Add node.js app to docker container & proxy the nginx secure port
- https://nodejs.org/en/docs/guides/nodejs-docker-webapp/
- https://www.digitalocean.com/community/tutorials/how-to-secure-a-containerized-node-js-application-with-nginx-let-s-encrypt-and-docker-compose
Public Side Complete
At this point, the left side of the diagram is complete. The Zoom notifications should be received by the the Internet server and published to an MQTT server.
4. Mosquitto on Private Network
I set up a separate instance of Mosquitto in bridge mode on a Mac Mini in my local network. This was done since I already had Mosquitto running and it prevented the need of the Raspberry Pi Zero to connect to the Internet accessible Mosquitto server. However, this step is a bit superfluous and the Node app on the Pi can connect directly to the public Mosquitto server.
mosquitto.conf Bridge Configuration
connection bridge-node
address example.com:8883
remote_username <mqtt_user>
remote_password <mqtt_password>

topic # in 0 "" ""
bridge_cafile /usr/local/etc/mosquitto/DST_Root_CA_X3.pem
The cafile for DST_Root_CA_X3.pem had to be downloaded and installed on my server. The certificate is a root certificate that Let's Encrypt's intermediate certificate files have been cross-signed against. This ensures that when the Mosquitto server connects over SSL it can verify the certificate it receives from Nginx. (Read)[https://letsencrypt.org/certificates/] on the Let's Encrypt certificates and signing. There are other options for Root certificates.
5. Create MQTT Listener & Pi Light Node App
The overall code base behind the MQTT listener and process to update the light is much larger than what is presented. I am planning on providing a UI to directly update the light from a Web Page, but that is not built yet. Most of the code to handle the webhook events and homebridge events condenses into 4+ files:
- App startup
- MQTT Listener
- Common LED Class
- LED Implementation Binding Class
App Startup
// app.js
// Bring in environment secrets through dotenv
require('dotenv/config')
const Listener = require('./lib/listener.js');
const ledImpl = process.env.ledImpl || 'pi-null-led';
const deviceId = process.env.deviceId || 'pi-zero-wh';

let listener = new Listener({
  deviceId,
  ledImpl,
  debug: true,
  mqtt: {
    url: process.env.mqttURL,
    options: {
      username: process.env.mqttUsername,
      password: process.env.mqttPassword
    }
  }
});
MQTT Listener
// lib/listener.js
const mqtt=require('mqtt');

class Listener {
  constructor({deviceId, ledImpl, debug, mqtt:{url, options}}) {
    const {createLedHandler} = require(`./${ledImpl}.js`);

    this.deviceId = deviceId || 'pi-zero-wh';

    this.led = createLedHandler();

    this.lastEvent = undefined;

    this.client = mqtt.connect(url,options);


    this.client.on("connect",function() {
      console.log("connected");

      this.client.subscribe(["zoom/#", `home/busylight/${this.deviceId}/#`], [], (err, granted) => {
        console.log("Subscribe:")
        console.log("  Error: ", err);
        console.log("  Granted: ", JSON.stringify(granted, null, 2));
      });
    }.bind(this));

    this.client.on("error",function(error){
      console.log("Can't connect"+error);
    });

    this.client.on('message', this.handleMessage.bind(this));

  }


  async handleMessage(topic, message) {
    console.log("handleMessage: " + JSON.stringify({topic, message: message.toString()}, null, 2));
    if (topic.startsWith("zoom/")) {
      let {rgb: [red, green, blue]} = await this.led.setPresence(message.toString());

      // Send stat message to MQTT Thing to update the state
      const pubTopic = `home/busylight/${this.deviceId}/light/stat/rgb`;
      const pubMessage = `${red},${green},${blue}`;

      this.client.publish(pubTopic, pubMessage);

    } else if (topic.startsWith("home/")) {
      this.handleHomeMessage(topic, message.toString());
    }
  }

  async handleHomeMessage(topic, message) {
    //console.log(`topic.indexOf("/cmd/"): ` + (topic.indexOf("/cmd/") > 0));

      if (topic.indexOf("/cmd/") > 0) {
        //console.log(`topic.indexOf("/rgb"): ` + (topic.indexOf("/rgb") > 0));
        if (topic.indexOf("/rgb") > 0) {
          const regex = /^\d\d?\d?,\d\d?\d?,\d\d?\d?$/;
          //console.log(`message.match(regex): ` + message.match(regex));
          if (message.match(regex)) {
            let json = `[${message}]`;
            let rgb = JSON.parse(json);
            //console.log(`message.match(regex): ${json}`);

            this.led.setColor({rgb});
            this.client.publish(topic.replace('cmd', 'stat'), message);
          }

        } else if (topic.indexOf("/power") > 0) {
          if (topic.indexOf("/zoom") > 0) {
            this.led.enablePresenceUpdates(message.toString() !== "true");
            this.client.publish(topic.replace('cmd', 'stat'), message);
          }
          if (topic.indexOf("/light") > 0) {
            this.led.setPower({power: message.toString() === "true"});
            this.client.publish(topic.replace('cmd', 'stat'), message);
          }
        }
      } else if (topic.indexOf("/stat/") > 0) {

      }

  }
}

module.exports = Listener;
Common LED Class
The Led class is a base class that handles most of the common logic of interpreting the message and keeping track of the last state of the light. The child classes then interact with the native node modules to update the light based on the common settings.
// lib/led.js
const storage = require('node-persist');
let path = require('path');

let appDir = path.dirname(require.main.filename);

class Led {
  constructor() {
    this.isInit = false;
    this.disablePresence = false;
  }

  async init() {
    await storage.init({
      dir: `${appDir}/storage`
    });
    this.isInit = true;
  }

  async setPresence(presence) {
    if (!this.isInit) {await this.init()}

    const {enable} = (await storage.getItem('enablePresenceUpdates')) || {enable: true};

    if (!enable) {
      return;
    }

    let color  = {
      rgb: [0, 0, 0],
      clear: false,
      lowlight: true
    }

    if (presence.toLowerCase() === 'away') {

      color.rgb = [255, 255, 0];
    } else if (presence.toLowerCase() === 'available') {
      color.rgb = [0, 255, 0];
    } else if (presence.toLowerCase() === 'do_not_disturb') {
      color.rgb = [255, 0, 0];
    }

    await this.setColor(color);

    return color;

  }

  async setColor(color) {
    if (!this.isInit) {await this.init()}

    console.log("Set color to :" + JSON.stringify(color));

    await storage.setItem('color', color);
  }

  async enablePresenceUpdates(enable) {
    if (!this.isInit) {await this.init()}

    this.disablePresence = !enable;
    //console.log(`enablePresenceUpdates(enable): ${enable}`)
    await storage.setItem('enablePresenceUpdates', {enable});

  }

  async setPower({power}) {
    if (!this.isInit) {await this.init()}

    let color = await storage.getItem('color');
    if (!color) {
      color = {
        rgb: [255, 255, 255],
        clear: false,
        lowlight: true
      };
    }

    if (power) {
      color.clear = false;
    } else {
      color.clear = true;
    }
    await this.setColor(color);

    await storage.setItem('power', {power});
  }

}

module.exports = Led;
Blinkt LED Class
Implementation for the Blink LED
// lib/pi-blinkt-led.js
let Led = require('./led.js');
let Blinkt = require('node-blinkt');

class BlinktLed extends Led {
    constructor() {
        super();

        try {
            this.leds = new Blinkt();

        } catch (err) {
            console.log(err);
            this.leds = {
                setAllPixels: () => {},
                clearAll: () => {}
            }
        }
    }

    async setColor(color) {
        let {rgb: [red, green, blue], clear, lowlight} = color;

        await super.setColor(color)

        if (clear) {
            this.leds.clearAll();
        } else {
            this.leds.setAllPixels(red, green, blue, (typeof lowlight !== 'undefined' && lowlight === true) ? 0.4 : 1.0);
        }
    }

}

module.exports = {
    createLedHandler : () => new BlinktLed(),
};
Unicorn Phat Class
Implementation for the Unicorn Phat module LED
// lib/pi-unicorn-phat-led.js
let Led = require('./led.js');

class UnicornPhatLed extends Led {

    constructor() {
        super();
        this.numberLeds = 32;

        try {
            this.leds = require('rpi-ws281x-native');
            this.leds.init(this.numberLeds, {dmaNum: 10});
            this.leds.setBrightness(25);

        } catch (err) {
            console.log(err);
            this.leds = {
                setAllPixels: () => {},
                clearAll: () => {}
            }
        }
    }

    async setColor(color) {
        let {rgb: [red, green, blue], clear, lowlight} = color;
        let pixel = (green << 16) | (red << 8) | blue;
        console.log(pixel.toString(16));

        let pixels = [];
        for (let i = 0; i < this.numberLeds; i++) {
            pixels.push(pixel);
        }

        await super.setColor(color)

        if (clear) {
            this.leds.reset();
        } else {
            this.leds.setBrightness((typeof lowlight !== 'undefined' && lowlight === true) ? 10 : 100);
            this.leds.render(pixels);
        }
    }

}

module.exports = {
    createLedHandler : () => new UnicornPhatLed(),
};
6. Bonus Homebridge & MQTT-Thing Plugin
I initially set up Homebridge on the Pi Zero itself to keep it separate from the existing instance. However, with so little RAM on the Pi Zero, it took a while to start up and probably started using a bit of swap. So I relented and setup the plugin on the primary Homebridge instance.
Since the Node app is already listening to the MQTT server, it was straight forward to add topics to the MQTT plugin and have the node app process those messages separately from the Zoon topic.

Example MQTT Plugin Config
"accessories": [
        {
            "accessory": "mqttthing",
            "url": "mqtt://example.local:1883",
            "username": "<local-mqtt-user>",
            "password": "<local-mqtt-password>",
            "mqttOptions": {
                "keepalive": 120
            },
            "logMqtt": true,
            "type": "custom",
            "name": "Busy Light Zero",
            "services": [
                {
                    "type": "lightbulb-RGB",
                    "name": "Busy Light",
                    "topics": {
                        "getOnline": "home/busylight/pi-zero-wh/light/stat/lwt",
                        "getRGB": "home/busylight/pi-zero-wh/light/stat/rgb",
                        "setRGB": "home/busylight/pi-zero-wh/light/cmd/rgb",
                        "getOn": "home/busylight/pi-zero-wh/light/stat/power",
                        "setOn": "home/busylight/pi-zero-wh/light/cmd/power"
                    }
                },
                {
                    "type": "switch",
                    "name": "Zoom Presence Override",
                    "topics": {
                        "getOnline": "home/busylight/pi-zero-wh/zoom/stat/lwt",
                        "getOn": "home/busylight/pi-zero-wh/zoom/stat/power",
                        "setOn": "home/busylight/pi-zero-wh/zoom/cmd/power"
                    }
                }
            ]
        }
    ]
Conclusion
This was a fun project giving me a chance to explore the Raspberry Pi Zero and build on some other technologies I had in place to automate the home.
The amount of custom code was small versus the library reuse and building on the strong work of others.
What's Next
The Zoom webhooks are great for receiving the events when you are connected to Zoom and access the Zoom APIs. This is great as a passive notification system for others to see.
Rather than reactive, I want the light to be proactive and act as reminder to the kids that they have a Zoom meeting scheduled for online class with their teacher. The zoom meeting times are now on a shared calendar. If I can get the Pi to read the calendar and change colors and play a sound when the meetings start, I can more easily ensure the kids are where they should be.To support this, I am looking at integrating Microsoft Office 365 Graph APIs to read the calendar.